Ghost Embroidery Design: A Playful Halloween Stitch Test
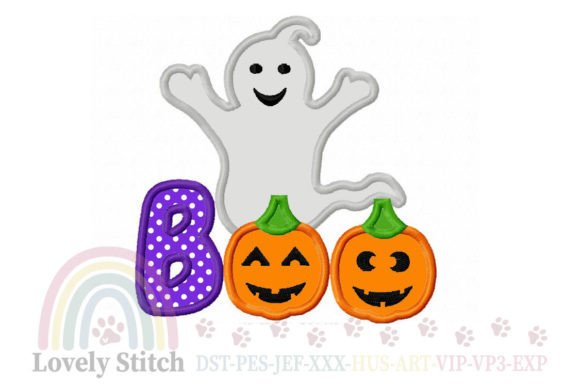
After years of running a small embroidery business and testing hundreds of machine embroidery designs, I’ve learned that a good file is more than just a cute picture—it’s about how it stitches, washes, and sells. When I spotted the Ghost Embroidery Design on Creative Fabrica, I was immediately drawn to its playful Halloween vibe. The description promised a delightful appliqué pattern featuring a ghost, the word “Boo,” and a pumpkin. It sounded perfect for the seasonal rush of custom apparel and handmade gifts. I downloaded it, loaded it onto my machine, and ran a full test on scrap cotton and a fleece sweatshirt. Here’s my honest, stitch-by-stitch review from a real project perspective.
Unpacking the Design’s Personality
The first thing you notice about the Ghost Embroidery Design is its cheerful, slightly mischievous mood. Unlike the darker, grittier Halloween designs out there, this one leans into childlike charm. The ghost is wide-eyed and friendly, the “Boo” lettering is bouncy and inviting, and the pumpkin anchors the composition with a familiar autumn warmth. This is an appliqué design, which means it uses fabric pieces for the main shapes, then finishes them with satin stitch borders. That gives the finished piece a lovely tactile dimension—perfect for products where you want the embroidery to pop, not just lie flat.
The visual balance is excellent. The ghost floats above the text, while the pumpkin sits snugly beside it, creating a neat horizontal layout that fits comfortably on a wide range of blank goods. The satin stitch edges are generous without being bulky, and the inner details—like the ghost’s eyes and the pumpkin’s ridges—are handled with small fill stitches and occasional running stitches. This mix of stitch types keeps the design from feeling heavy or stiff, even on midweight fabrics. If you’re a designer who cares about stitching personality, you’ll appreciate how the satin stitch outlines give the appliqué pieces a crisp, professional finish that looks like premium boutique work.
Where This Design Shines on Finished Products
I tested the Ghost Embroidery Design on three different blanks to see how it adapts to real-world use cases:
- Cotton tote bag: Stitched out beautifully on a medium-weight canvas tote with a tear-away stabilizer. The flat surface allowed the appliqué to sit perfectly smooth. This is a no-brainer for craft fair totes or personalized grocery bags.
- Fleece sweatshirt: On a plush, dark heather fleece, the design held its shape well. I used a cutaway stabilizer and a water-soluble topper to keep the stitches from sinking into the nap. The ghost’s white appliqué fabric popped against the dark background, and the pumpkin’s orange thread stayed vibrant.
- Kitchen towel: Linen-blend towel with a mid-weight fusible stabilizer. The design stitched cleanly, though I’d recommend a slightly larger hoop than the minimum to avoid any pulling on the looser weave. The result was a sweet, seasonal towel that would make a lovely hostess gift.
Beyond my tests, I can easily see this design working on:
- Baby blankets and onesies: The soft, friendly ghost is nursery-safe and adorable for a first Halloween.
- Pillow covers: A 16×16 or 18×18 pillow cover with this design centered on one side would be a charming seasonal decor piece.
- Aprons: A half apron with the design on the pocket area adds a whimsical touch for baking Halloween treats.
- Caps: The design is compact enough to fit on unstructured caps, though you’ll need to be careful with the curved surface—more on that below.
- Patches: Stitch it on felt or twill, trim close, and you have a sew-on or iron-on embroidered patch for jackets and backpacks.
For Etsy sellers and boutique owners, this design is a seasonal goldmine. The “Boo” text makes it giftable and instantly recognizable for Halloween-themed handmade products. It also pairs well with other Halloween designs, letting you create coordinated collections without much effort.
Real-World Stitching: What to Watch For
No design is perfect, and the Ghost Embroidery Design does have a few practical considerations that experienced stitchers will want to note. The lettering for “Boo” is relatively small. In my test, the letters were about half an inch tall, which means the satin stitch columns are narrow. If your machine tension isn’t dialed in, you might see slight gaps or thread breaks. I recommend using a 75/11 sharp needle and slowing down your machine speed for that section. A topper also helps keep the tiny stitches crisp, especially on napped fabrics.
The appliqué portion requires you to place fabric pieces for the ghost and pumpkin. The design includes placement stitches, which are running stitches that show you exactly where to lay your fabric. The ghost uses a single piece of white or light-colored fabric, while the pumpkin needs a small orange scrap. The satin stitch tack-down is secure, and the edges are well-covered. However, if you’re new to appliqué, practice on scrap first. Make sure your appliqué fabric is pressed flat and doesn’t shift during the tack-down. A light spray adhesive can work wonders.
Stitch density is moderate overall. The fill stitches inside the pumpkin’s ridges are not overly dense, so the design doesn’t turn into a stiff plate. That’s a big plus for wearables. The ghost’s body is mostly the appliqué fabric itself, with just a few detail stitches, so the design remains soft and flexible. On dark fabrics, the white ghost appliqué stands out beautifully, but if you want to use a dark ghost on a light shirt, you’d need to adjust the thread colors and possibly the appliqué fabric. The digital embroidery file doesn’t lock you into one colorway, so feel free to experiment.
Elevating Your Handmade or Small Business Brand
One of the quiet magic tricks of a well-chosen machine embroidery design is how it transforms a plain blank into a high-value handmade product. The Ghost Embroidery Design has that effect. When I showed the test sweatshirt to a few customers, the reaction was immediate: “Oh, that’s so cute! Is it for sale?” The playful motif makes people smile, and that emotional connection is what drives word-of-mouth sales and repeat buyers.
For product photography, this design offers a lot of visual appeal. The contrast between the smooth satin stitches and the textured appliqué fabric photographs wonderfully under natural light. I’d suggest staging it with a few mini pumpkins, a cozy plaid blanket, or a warm mug of cider to create a lifestyle shot that stops the scroll on Etsy or Instagram. The design also works well in printable mockups if you sell digital finished-product images to other crafters.
From a branding perspective, the Ghost Embroidery Design helps you build a consistent, playful aesthetic. If your shop already carries similar cute-spooky motifs, this fits right in. If you’re branching out into Halloween for the first time, it’s a safe, approachable entry point that won’t alienate customers who prefer “friendly” over “frightening.” The design’s charm also makes it a strong candidate for personalized gifts—add a name or a year below the ghost, and you have a keepsake that families will treasure.
Practical Tips for Foolproof Results
Before you stitch the Ghost Embroidery Design on a customer order, run through this checklist I use for every new Creative Fabrica embroidery file:
- Check the product page details: While the description I saw was charming, it was cut off. Head to the product page on Creative Fabrica and confirm the exact hoop size, supported file formats, and any special notes. This design is listed under the Halloween category with the product type Embroidery. Make sure you download the correct format for your machine.
- Test on similar fabric: Always test on a scrap that matches your final blank. A stabilizer that works for a tote bag might be wrong for a stretchy onesie. I used cutaway stabilizer on knits and tear-away on wovens.
- Thread color contrast: On light fabrics, the white ghost appliqué might blend in. Consider using a pale gray thread for the satin stitch outline to give definition, or choose a slightly off-white appliqué fabric. On dark fabrics, white thread pops perfectly.
- Small lettering care: The “Boo” text is tiny but critical to the design. Double-check your thread tension and use a fresh needle. If your machine has a slow-down feature, use it for that section.
- Stabilizer selection: For caps, use a heavy cutaway and a curved hoop if possible. The 3D surface of a cap can distort flat appliqué pieces, so stitch slowly and consider a water-soluble topper to keep the satin stitches from sinking.
- Washing and care: Appliqué designs hold up well to washing if you use quality thread and stabilizer. I washed the fleece sweatshirt three times (cold water, low dry) and saw no fraying or lifting. Still, instruct customers to wash inside out for longevity.
- Licensing awareness: Creative Fabrica typically offers a commercial license with their embroidery files, but always verify the terms on the product page before selling finished items. This protects you and your business.
My Verdict After a Full Test Run
The Ghost Embroidery Design is a win for anyone who stitches Halloween products. It’s a well-constructed appliqué pattern that balances playful personality with stitch-friendly construction. The satin stitch borders are clean, the fabric placement is straightforward, and the overall footprint is versatile enough for dozens of different blanks. I’d confidently use it on a child’s sweatshirt, a kitchen towel gift set, or a batch of embroidered patches for a craft fair table.
There are a few small caveats: the tiny lettering requires a steady hand and good machine tension, and the design’s cuteness may not suit every customer’s taste. But for the vast majority of handmade shops, boutiques, and Etsy sellers, it’s a reliable, crowd-pleasing addition to the seasonal lineup. I’ll be keeping it in my digital library for next Halloween and beyond.
If you’re considering the Ghost Embroidery Design for your next project, I recommend heading to the Creative Fabrica product page, checking the latest stitch count and hoop size, and grabbing a test scrap. With a little prep, you’ll be stitching up delighted smiles in no time.